

How to Configure HMA Using the Whitelist Mode
How to Configure HMA Using the Whitelist Mode Some of the important tools in the management of Android applications, especially for privacy and security reasons, include the ability to hide applications from detection. This becomes very important for users who use applications sensitive to root access or applications that could be flagged off for various reasons by security measures. HMA’s Whitelist mode makes it quite easy to hide applications from the detection of security systems and handle which applications are allowed to interface with the others. This post will explain in detail how to set up HMA using Whitelist mode for maximum security, by walking you through a step-by-step process.
What is the Whitelist Mode in HMA?
HMA provides the so-called Whitelist mode, that is a form of explicitly whitelisting the configuration of apps to work in free operation whereas blocking the interference from other applications. Unlike in the Blacklist mode, in which you blocked explicitly certain applications, in the Whitelist mode you state which ones should be allowed to operate without disturbance. This will be especially useful for applications that require rooted access or are sensitive in terms of application interactions, such as banking applications or applications that implement detection algorithms flagging a device as rooted.
By setting up HMA in Whitelist mode, you ensure that only the applications you identify can interface with sensitive applications or detect root access, further smoothing your overall application management experience.
Related Article
- Install LSPosed
- Configure HMA using the Blacklist Mode
- Configure HMA using the Whitelist Mode
- Hide My Applist Guide
- Hiding an app from Store
- Backup and Restore HMA settings
- HMA Blacklist vs Whitelist
- Magisk-SafetyNet-Fix
- Passing Integrity Check API Testing
- Shamiko
Getting Started: Accessing HMA
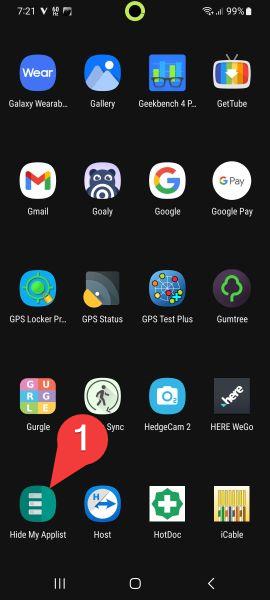
Getting started with the setup of HMA in Whitelist mode, you first have to be in the right part of the application. First, open the HMA Home tab from your app drawer. You will then be taken to the home screen from where you can access all the features of the app and set things up accordingly.
Step 1: Accessing App Management
Click the App Manage button on the Home tab to proceed with managing your installed apps to the next screen.
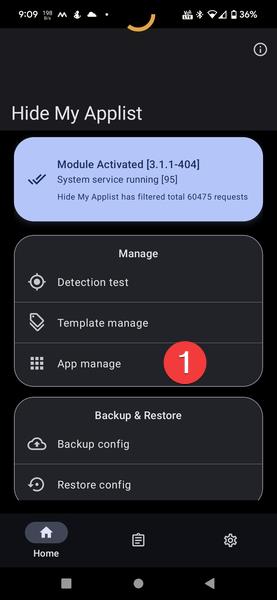
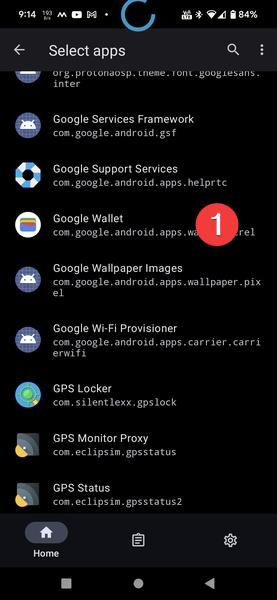
Once you tap App Manage, you will be presented with a list of all the apps installed on your device. You can go through this list to decide which apps you want to set up for hiding and which ones to exclude from the app-hiding mechanism.
Step 2: Selecting Apps to Hide
In the list of applications installed on your device, carefully pick out those you will not want detected or interacted with. These include applications like: - Banking applications These need additional security not to permit root access. - Root detection applications these flag rooted devices and may conflict with other applications, especially in the case of sensitive operations.
- Apps vulnerable to detection: Apps that can reveal vulnerabilities or unwanted behavior when accessed by rooted apps. Having identified the apps for protection, tap on them individually to configure.
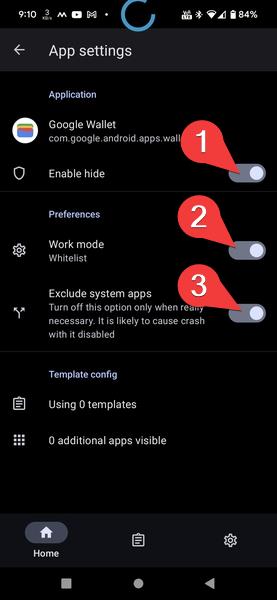
**Step 3: Configuring the Apps in Whitelist Mode
For each selected application, you need to set the following settings appropriately to get it correctly configured.
- Enable Hide: Click the button beside Enable Hide to enable the hide mechanism of an app. This will make sure that the app is completely hidden from the view of other apps and the system itself.
- Work Mode: Click the button beside Work Mode and switch it to Whitelist mode. This will make sure that only the apps specified are allowed to interact with each other, blocking root detection or interference from other apps.
- Exclude System Apps: It is recommended to turn Exclude System Apps on to prevent modification or tampering with the system apps while setting up. This will keep the essential system processes intact.
Now touch the back navigation key to back after configuring each app, or simply swipe back in case of using the newer-style gesture navigations, to the App List then follow the same procedures in each for adding other desired apps in Whitelist.
**Saving Settings and Restart **
After setting up all the apps, the next thing you need to do is complete the setup and ensure that the changes take effect as they are supposed to.
**Step 4: Completing Configuration
You finish the setup by fully killing the HMA application. Once done, make sure you reboot the device itself so it refreshes the configuration from HMA. Note that on HMA, a system restart is absolutely necessary to activate this setup since apps might otherwise not hide their presence on the system.
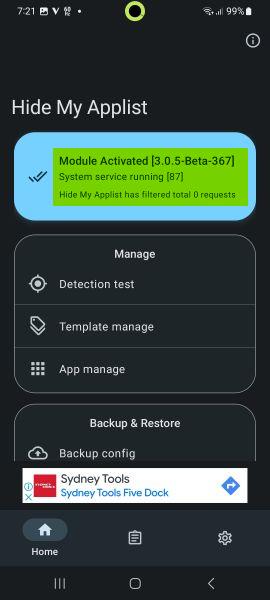
**Step 5: Activated!
Now after the device has booted, launch your HMA app once again from within your app drawer. You now should have something similar to that below, meaning the configuration applied, and the status of the HMA status is on Activated.
Step 6: Wait for Initial Boot to Complete
The very first time you boot your device after setting up HMA in Whitelist mode, there may be a little delay. This is normal - it usually takes a few minutes for HMA to become fully active and start working properly. Sometimes, it may take a couple of reboots before the configuration goes into effect. We recommend waiting at least 5 minutes before trying any of the apps you have hidden or excluded.
In case the configuration does not take effect immediately after the reboot, do a second reboot for making sure all the settings are set correctly.
Important Notes to HMA Configuration
Reboots are required: Any time a configuration change is made in HMA, a reboot is required for changes to take effect.
First boot after configuration: The first boot after configuration may take some minutes; please avoid opening apps that you have hidden or configured until you are sure the system is fully initialized.
Multiple reboots: On rare occasions, it may take an additional reboot for the changes to take effect properly. If you encounter issues, try restarting your device again before troubleshooting further.

Conclusion
You can, with this guide, set up HMA on Whitelist mode to protect those sensitive applications by ensuring only the trusted applications are allowed to operate without any flagging of root or security violations. This will give you great customization and flexibility since you have control over which apps actually interact with one another while keeping the security and privacy of the device intact.
This is called **Whitelist mode, providing an advanced level application management for rooted devices; hence, ensuring more security within while the apps that will run are considered smooth. Immediately after following its configuration steps, which have to be well followed to perfection and restart. Afterwards, observe abnormal behaviors for all the apps and then head down to Testing HMA page on how you can troubleshoot the problem; or for hints about how using HMA effectively with more outcomes.
FAQs
What is the difference between Blacklist and Whitelist mode in HMA?
- In Blacklist mode, you block specific apps while in Whitelist mode you allow some apps to work freely and block all other apps from communicating with them.
**How long does it take for HMA to be activated after configuration?
- HMA takes some minutes after every reboot, sometimes it takes one or two reboots.
How do I whitelist system applications to not be hidden by HMA?
- Remove system applications from HMA’s configurations to not conflict with needed systems that may be running in the background.
**Can multiple apps be configured for a single step setting of hiding?
- Yes, you can configure more than one application in succession: select those appearing in the list of apps, then apply Whitelist settings for each.
Is a restart needed on my device after any kind of configuration that I make to HMA?
- Yes, any kind of configuration change in HMA requires a reboot to have it applied properly.