
How We Finally Organized Our ROM Collection on a NAS: A Comprehensive Guide
The allure of playing our favorite retro games, anytime and anywhere, is undeniable. But managing a sprawling ROM collection can quickly become a chaotic nightmare. Cloud saves and the ability to pick up our progress on any device, all hosted privately from home? That’s the dream. This guide details our journey towards achieving precisely that: a perfectly organized ROM collection, accessible across multiple devices, backed up securely, and powered by a Network Attached Storage (NAS) solution. We’ll walk you through the software, the configurations, and the best practices we’ve learned along the way.
The Foundation: Choosing the Right NAS
The NAS is the heart of our retro gaming empire. Selecting the right model is paramount. We opted for a Synology DS920+ for its balance of performance, storage capacity, and software ecosystem. Other viable options include QNAP devices or even a self-built NAS using a dedicated PC and open-source software like TrueNAS.
Critical NAS Features for Retro Gaming
- Processing Power: Emulation, especially for more demanding consoles like PlayStation 2 or GameCube, requires a decent CPU. Look for a NAS with an Intel Celeron or better processor.
- RAM: Sufficient RAM is crucial for smooth operation, especially when running multiple services simultaneously (file sharing, Plex, EmulationStation, etc.). 4GB is a good starting point, but 8GB or more is preferable.
- Storage Capacity: The size of your ROM collection will dictate the required storage. We recommend starting with at least 4TB of usable storage, configured in a RAID array for redundancy. Consider future expansion when making your choice.
- Networking: Gigabit Ethernet is essential for fast file transfers and smooth streaming. Some NAS models also offer 2.5GbE or 10GbE for even faster performance.
- Docker Support: Docker is a game-changer for running various applications, including emulation frontends and cloud save solutions, in isolated containers. Ensure your NAS supports Docker.
Setting Up the NAS
- Initial Configuration: Follow the manufacturer’s instructions to install the hard drives, connect the NAS to your network, and install the operating system (e.g., Synology DSM or QNAP QTS).
- Creating Shared Folders: Create dedicated shared folders for your ROMs, BIOS files, save states, and media (box art, screenshots). These folders will be accessible from your various devices.
- User Permissions: Set up user accounts with appropriate permissions to access the shared folders. This allows you to control who can access and modify your ROM collection.
- Network Configuration: Configure a static IP address for your NAS to ensure consistent access. Consider setting up port forwarding if you want to access your NAS from outside your home network. This requires careful consideration of security implications.
Organizing the ROM Collection: A Meticulous Approach
A well-organized ROM collection is key to a smooth retro gaming experience. We advocate for a system that is both logical and easy to navigate.
Folder Structure
Our preferred folder structure is based on console:
/ROMs
    /Atari 2600
    /NES
    /SNES
    /Nintendo 64
    /Game Boy
    /Game Boy Advance
    /PlayStation
    /PlayStation 2
    /PSP
    ...
Within each console folder, ROMs are named according to a consistent naming convention.
ROM Naming Convention
We recommend using the No-Intro naming convention, which provides a standardized way to name ROM files. This convention includes information such as the game title, region, revision, and other relevant details.
Example: Super Mario World (USA).zip
Using a ROM manager like Romulus can help you rename and organize your ROMs according to the No-Intro standard.
BIOS Files
Certain emulators require BIOS files to function correctly. These files should be placed in a dedicated “BIOS” folder within your ROMs directory. Ensure you obtain BIOS files legally, as they are often copyrighted.
Media Files (Box Art, Screenshots)
High-quality box art and screenshots enhance the retro gaming experience. We use a tool called Skraper to automatically download and organize media files for our ROMs. Skraper supports various scraping sources and allows you to customize the download settings.
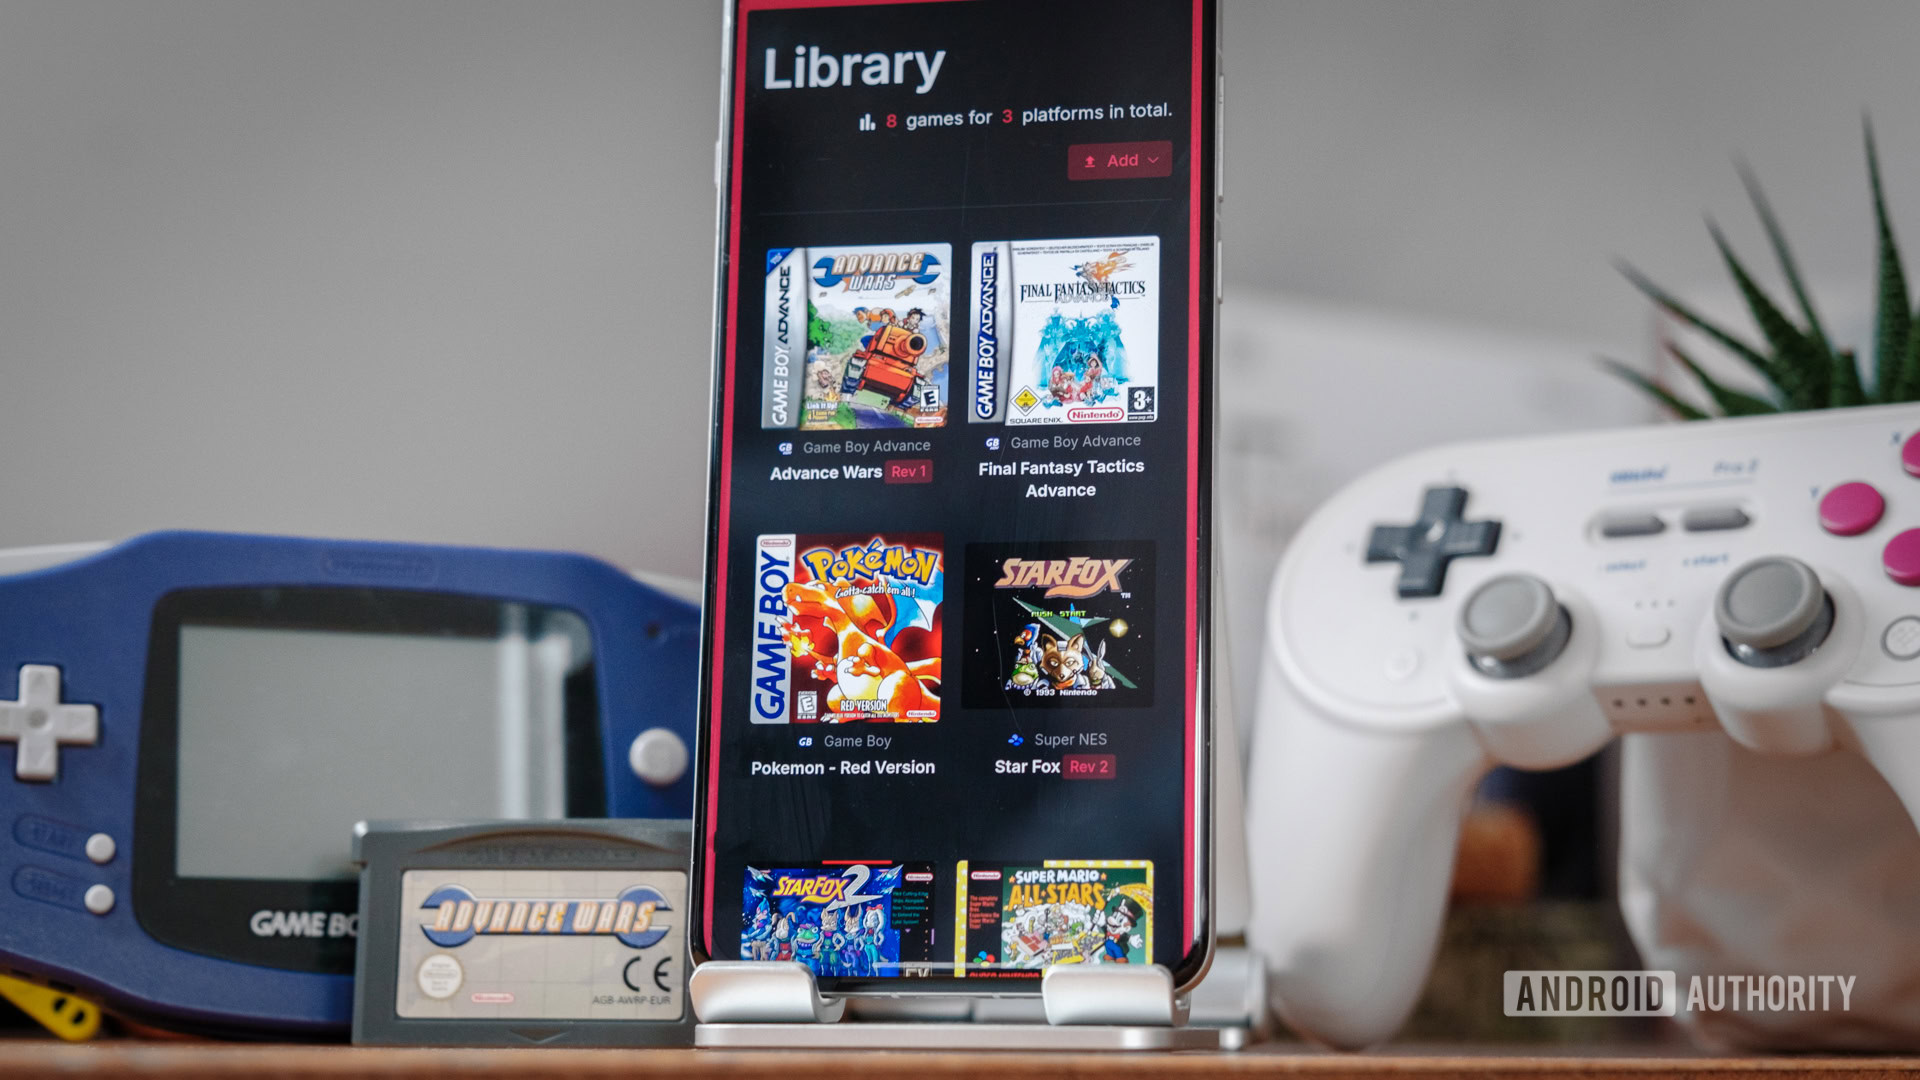
EmulationStation: The Central Hub
EmulationStation is a popular open-source emulation frontend that provides a unified interface for launching ROMs from various consoles. We use it as the central hub for our retro gaming setup.
Installing EmulationStation on the NAS
The easiest way to install EmulationStation on a NAS is using Docker. We use the linuxserver/emulatorjs Docker image, which provides a pre-configured EmulationStation environment.
- Install Docker: Install the Docker package from your NAS’s app store.
- Download the Docker Image: Pull the
linuxserver/emulatorjsimage from Docker Hub. - Configure the Docker Container: Create a new Docker container using the
linuxserver/emulatorjsimage.- Mount Points: Configure mount points to map your ROMs, BIOS, and save states folders from the NAS to the container.
- Port Mapping: Map the EmulationStation web interface port (usually 8080) to a port on your NAS.
- Environment Variables: Set environment variables to configure EmulationStation’s behavior.
- Start the Container: Start the Docker container.
Configuring EmulationStation
- Access the Web Interface: Open a web browser and navigate to the NAS’s IP address followed by the EmulationStation port (e.g.,
http://192.168.1.100:8080). - Add ROM Paths: Configure EmulationStation to scan your ROM directories.
- Scrape Metadata: Use EmulationStation’s built-in scraper or Skraper to download metadata (game information, box art, screenshots) for your ROMs.
- Configure Emulators: Configure EmulationStation to use the appropriate emulators for each console. This often involves specifying the path to the emulator executable and configuring command-line arguments.
- Customize the Interface: Customize the EmulationStation interface with themes and artwork.
Choosing the Right Emulators
Selecting the right emulator is crucial for optimal performance and compatibility. We recommend the following emulators:
- RetroArch: A versatile multi-system emulator that supports a wide range of consoles.
- Dolphin: A powerful emulator for GameCube and Wii games.
- PCSX2: A PlayStation 2 emulator with good compatibility.
- PPSSPP: A PSP emulator with excellent performance.
These emulators can all be configured to run within EmulationStation.
Cloud Saves: Play Anywhere, Anytime
Cloud saves are the key to seamless cross-device gaming. We use Syncthing to synchronize save states between our NAS and our various devices.
Installing Syncthing
Syncthing is a free and open-source file synchronization program that allows you to synchronize files between multiple devices.
- Install Syncthing on the NAS: Install the Syncthing package from your NAS’s app store or use a Docker image.
- Install Syncthing on Your Devices: Install Syncthing on your computers, smartphones, and tablets.
Configuring Syncthing
- Create a Shared Folder: Create a shared folder on the NAS for your save states.
- Add Devices: Add your devices to Syncthing. This involves exchanging device IDs between the NAS and your devices.
- Configure Folders: Configure Syncthing to synchronize the save states folder between the NAS and your devices.
- Enable Versioning: Enable versioning to keep track of save state changes and prevent data loss.
Emulator Configuration
Configure your emulators to save save states to the Syncthing shared folder. This ensures that your save states are automatically synchronized between your devices.
Accessing Your ROM Collection Remotely
Accessing your ROM collection remotely allows you to play your games from anywhere in the world. This requires careful consideration of security implications.
VPN Access
The most secure way to access your ROM collection remotely is through a Virtual Private Network (VPN). A VPN creates an encrypted tunnel between your device and your home network, protecting your data from eavesdropping.
- Set Up a VPN Server on Your NAS: Many NAS models offer built-in VPN server functionality. Alternatively, you can use a Docker image to run a VPN server like OpenVPN or WireGuard.
- Connect to the VPN: Connect to the VPN server from your device before accessing your ROM collection.
Port Forwarding (Not Recommended)
Port forwarding allows you to directly access your NAS from the internet. However, this exposes your NAS to potential security vulnerabilities. We strongly recommend against using port forwarding unless you have a strong understanding of network security.
If you choose to use port forwarding, ensure you take the following precautions:
- Use Strong Passwords: Use strong, unique passwords for all user accounts on your NAS.
- Enable Two-Factor Authentication: Enable two-factor authentication for added security.
- Keep Your NAS Software Up to Date: Regularly update your NAS operating system and applications to patch security vulnerabilities.
- Use a Firewall: Configure a firewall to restrict access to your NAS.
Backups: Protecting Your Precious ROMs
Regular backups are essential to protect your ROM collection from data loss. We recommend implementing a multi-layered backup strategy.
On-Site Backups
- External Hard Drive: Back up your ROM collection to an external hard drive on a regular basis.
- Snapshotting: Use your NAS’s snapshotting feature to create point-in-time copies of your data. This allows you to quickly restore your ROM collection to a previous state in case of data corruption or accidental deletion.
Off-Site Backups
- Cloud Backup: Back up your ROM collection to a cloud storage service like Backblaze B2 or Amazon S3. This protects your data from physical disasters such as fire or flood.
- Off-Site NAS: Replicate your ROM collection to a second NAS located at a different location.
Advanced Tips and Tricks
- Game Streaming: Use a game streaming service like Moonlight or Steam Link to stream games from your NAS to your devices. This allows you to play demanding games on devices with limited processing power.
- RetroAchievements: Enable RetroAchievements to track your progress and earn achievements in retro games.
- Custom ROMs: Experiment with custom ROMs that offer improved graphics, gameplay, or features.
- Community Resources: Join online communities and forums to learn from other retro gamers and share your experiences. The Magisk Module Repository and the Magisk Modules website are a great place to start.
By following these steps, we’ve successfully created a perfectly organized ROM collection that is accessible, secure, and backed up. Enjoy your retro gaming journey!