
How to Unlock the Enhanced Windows 11 Start Menu: A Comprehensive Guide
In the dynamic landscape of operating system updates, Microsoft frequently introduces enhancements that, while sometimes subtle, can significantly alter user experience. Recently, a seemingly routine update, specifically KB5067036, released on October 28th, has been circulating, bringing with it a wealth of performance improvements and critical bug fixes. While this update may have largely flown under the radar for many users, it contains a hidden gem, a significant alteration to the Windows 11 Start Menu that has generated considerable interest. This guide is meticulously crafted to provide an in-depth, step-by-step walkthrough for enabling this enhanced Windows 11 Start Menu, ensuring you can leverage its new features and improved functionality. We will delve into the nuances of this update and provide clear, actionable instructions, designed to empower you to modernize your Windows 11 interface and enhance your daily computing efficiency.
Understanding the Evolution of the Windows 11 Start Menu
The Windows 11 Start Menu represented a significant departure from its predecessors, moving towards a more streamlined, centered design with a focus on pinned applications and a quick access section for recently used files. However, user feedback and the continuous drive for improvement have led Microsoft to refine this experience further. The update we are focusing on doesn’t entirely reinvent the wheel but rather introduces a more robust and customizable iteration, offering users greater control over their digital workspace. This evolution is a testament to Microsoft’s commitment to adapting its user interface based on user interaction and technological advancements. The introduction of new features within the Start Menu aims to streamline navigation, improve discoverability of applications, and provide a more personalized user experience, ultimately contributing to a more productive and enjoyable computing environment.
Identifying the Key Update: KB5067036
The pivotal update responsible for unlocking the new Windows 11 Start Menu features is KB5067036. This particular update, rolled out on October 28th, is more than just a collection of routine maintenance tasks. While it diligently addresses performance bottlenecks and squashes various bugs that may have impacted system stability and speed, its most impactful contribution lies in the Start Menu’s underlying architecture. It’s crucial to ensure your system has successfully installed this specific update to proceed with enabling the enhanced Start Menu. Without this foundational update, the new functionalities will remain inaccessible, regardless of the steps taken thereafter. We will guide you on how to verify its installation and troubleshoot any potential issues.
Verifying the Installation of KB5067036
Before diving into the activation process, the most critical first step is to confirm that KB5067036 is indeed installed on your system. This verification process is straightforward and can be performed through the Windows Update settings.
- Access Windows Update: Navigate to Settings by pressing Windows key + I. From the left-hand menu, select Update & Security.
- View Update History: Within the Update & Security settings, click on View update history. This will display a list of all recently installed updates.
- Locate KB5067036: Carefully scroll through the list, paying attention to the “Quality Update” section. You are looking for an entry labeled “2023-XX Cumulative Update for Windows 11 (KB5067036)”. The exact date will vary depending on when the update was applied.
- Confirmation: If you find KB5067036 listed, you can proceed with the next steps. If it is not present, your system needs to download and install it. You can initiate this by clicking “Check for updates” on the main Windows Update page. Ensure your system is connected to the internet and allow sufficient time for the download and installation to complete. A system restart will likely be required for the update to take full effect.
Enabling the New Windows 11 Start Menu: A Detailed Process
With the foundational update confirmed, we can now proceed to the core of enabling the enhanced Windows 11 Start Menu. This process typically involves making a specific configuration change. While Microsoft often rolls out such features in stages, this particular update seems to unlock the potential for a more refined Start Menu experience that can be explicitly enabled by users. The method we will describe is the most direct and effective way to access these new features.
Leveraging the Registry Editor for Start Menu Configuration
The Windows Registry is a powerful, hierarchical database that stores low-level settings for the operating system and for applications that opt to use the registry. Modifying it requires caution, as incorrect changes can lead to system instability. However, for enabling specific features like the enhanced Start Menu, it is often the most direct route. We will guide you through the precise steps to ensure accuracy.
Open the Registry Editor:
- Press Windows key + R to open the Run dialog box.
- Type regedit and press Enter or click OK.
- If prompted by User Account Control (UAC), click Yes to allow the Registry Editor to make changes to your device.
Navigate to the Specific Registry Key:
- In the Registry Editor window, you will need to navigate through a series of folders, also known as keys.
- Carefully follow this path:
HKEY_CURRENT_USER\Software\Microsoft\Windows\CurrentVersion\Explorer\Advanced - You can copy and paste this path directly into the address bar at the top of the Registry Editor window and press Enter for quick navigation.
Create or Modify the DWORD Value:
- Once you have reached the
Advancedkey, look in the right-hand pane of the Registry Editor window. - You are looking for a value named
Start_ShowMoreTiles. - If
Start_ShowMoreTilesexists: Double-click on it to open its Value data editor. - If
Start_ShowMoreTilesdoes not exist:- Right-click in an empty space in the right-hand pane.
- Select New > DWORD (32-bit) Value.
- Name the new value exactly
Start_ShowMoreTiles. Ensure there are no typos.
- Once you have reached the
Configure the Value Data:
- When the
Start_ShowMoreTilesvalue is open for editing, you will see a field for Value data. - To enable the enhanced Start Menu functionality, set the Value data to
1. - If the value already exists and is set to
0, changing it to1will enable the feature. If it’s already1, you may need to toggle it to0and then back to1to reapply the setting, or proceed to the restart step. - Click OK to save the changes.
- When the
Restart Windows Explorer:
- For the changes to take effect, you need to restart the Windows Explorer process. This process manages the taskbar, Start Menu, and File Explorer.
- Open the Task Manager by pressing Ctrl + Shift + Esc.
- Go to the Processes tab.
- Scroll down to find Windows Explorer.
- Right-click on Windows Explorer and select Restart.
- Alternatively, you can restart your entire computer. A full system restart is often recommended to ensure all system processes are reloaded with the new configuration.
Exploring the New Features of the Enhanced Start Menu
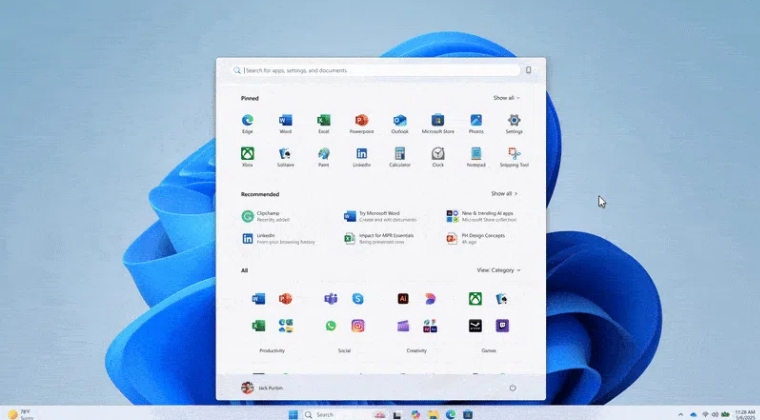
Once you have successfully applied the registry change and restarted, you should observe a noticeable difference in your Windows 11 Start Menu. While the fundamental layout might remain familiar, the underlying functionality and options available have been expanded.
Increased Pinning Capacity and Organization
One of the most immediate and apparent benefits of the enhanced Start Menu is the increased capacity for pinning applications and folders. Previously, the Start Menu might have felt somewhat constrained in how many items you could prominently display. The update often allows for a more expansive layout, enabling you to keep more of your frequently used programs and shortcuts readily accessible. This means less time spent searching through the app list and more time being productive. You can often achieve this by dragging and dropping icons directly onto the Start Menu.
Enhanced Folder Grouping and Management
Beyond just increasing the number of pinned items, the enhanced Start Menu introduces more sophisticated options for organizing your pinned applications. This can include the ability to create folders or groups within the Start Menu itself. Imagine being able to group all your creative software, productivity tools, or gaming applications into dedicated sections, making navigation even more intuitive. This feature greatly reduces clutter and allows for a more personalized and efficient workspace. Look for options to drag and drop pinned items onto one another to create these groupings.
Improved Search Functionality Integration
The Search bar integrated within the Start Menu is also often a beneficiary of these updates. With the enhanced version, you may find that search results are more refined, quicker, and potentially offer richer previews or suggestions. This ensures that finding files, applications, or even web results is a seamless and efficient process. The update aims to make the search function a more central and powerful tool for navigating your Windows environment.
Customization Options for Layout and Appearance
While the core design language of Windows 11 is maintained, the enhanced Start Menu often brings with it additional customization options. This could include the ability to adjust the number of rows or columns for pinned items, or even different visual themes or layouts that better suit your preferences. These fine-tuning capabilities allow users to tailor their Start Menu to precisely match their workflow and aesthetic sensibilities. Explore the Personalization settings in Windows to see if new options related to the Start Menu have become available.
Troubleshooting Common Issues and Advanced Considerations
While the process of enabling the enhanced Windows 11 Start Menu is generally straightforward, occasional glitches or unexpected behavior can occur. This section addresses common issues and provides insights into more advanced scenarios.
What if the Start Menu Doesn’t Change After the Registry Edit?
There are several reasons why the Start Menu might not reflect the changes after modifying the registry:
- Incorrect Registry Path or Value Name: Double-check that you have navigated to the exact
HKEY_CURRENT_USER\Software\Microsoft\Windows\CurrentVersion\Explorer\Advancedkey and that the DWORD value is precisely namedStart_ShowMoreTiles. Even a minor typo can prevent the setting from being recognized. - Pending System Restart: Ensure you have performed a full system restart, not just a restart of Windows Explorer. Some system-level changes require a complete reboot to be fully implemented.
- Update Not Fully Installed: Revisit the Windows Update history (Settings > Update & Security > View update history) to confirm that KB5067036 is listed as successfully installed. If not, try running the Windows Update troubleshooter or manually downloading the update from the Microsoft Update Catalog.
- Conflicting Third-Party Software: In rare cases, third-party customization tools or system optimizers might interfere with registry changes or Start Menu behavior. Try temporarily disabling such software to see if it resolves the issue.
- Corrupted System Files: If none of the above solutions work, it’s possible that some core Windows system files are corrupted. Running the System File Checker tool can help identify and repair such issues. Open Command Prompt as an administrator (search for
cmd, right-click, and select “Run as administrator”) and typesfc /scannowand press Enter.
Reverting to the Standard Start Menu
If you find that the enhanced Start Menu does not meet your expectations or if you encounter persistent issues, reverting to the standard configuration is a simple process:
- Open Registry Editor: As described previously, open regedit.
- Navigate to the Key: Go to
HKEY_CURRENT_USER\Software\Microsoft\Windows\CurrentVersion\Explorer\Advanced. - Modify or Delete the Value:
- Double-click on
Start_ShowMoreTiles. - Change the Value data back to
0. - Click OK.
- Alternatively, you can delete the
Start_ShowMoreTilesvalue entirely by right-clicking on it and selecting Delete.
- Double-click on
- Restart Windows Explorer or Your PC: Restart Windows Explorer through Task Manager or perform a full system restart for the changes to take effect.
Future-Proofing Your Windows Experience
Keeping your Windows operating system updated is paramount to accessing new features and ensuring optimal performance. Regularly checking for and installing Windows Updates, including optional and cumulative updates, is the best way to stay on top of Microsoft’s latest developments. For users who appreciate fine-grained control over their system and enjoy exploring new functionalities, staying informed about these updates and their impact on core Windows components like the Start Menu is highly beneficial.
The Significance of KB5067036 in the Broader Context
The introduction of KB5067036 signifies Microsoft’s ongoing commitment to refining the Windows 11 user experience. While feature rollouts can sometimes be incremental, this particular update has provided a tangible improvement to a central component of the operating system. By understanding how to enable and manage these changes, users can ensure they are leveraging the most efficient and user-friendly version of Windows 11. This proactive approach to system configuration allows you to tailor your computing environment to your specific needs and preferences.
In conclusion, the update KB5067036 has quietly brought forth a significant enhancement to the Windows 11 Start Menu. By following the detailed steps outlined in this guide, particularly the precise registry modifications, you can unlock a more versatile and organized Start Menu experience. We have covered the essential verification steps, the direct method for enabling the new features, explored the benefits of the enhanced Start Menu, and provided troubleshooting tips for common issues. This comprehensive approach empowers you to modernize your Windows 11 interface and ensure your Start Menu serves as a more powerful and personalized hub for your daily digital activities. Remember, staying informed about Windows updates and understanding how to implement these subtle yet impactful changes is key to maximizing your productivity and enjoyment of your PC.