
How to Fix Null IMEI by Restoring NVRAM & NVDATA Using SP Flash Tool: A Comprehensive Guide
Encountering a Null IMEI on your Android device can be a frustrating experience, rendering your phone incapable of making calls, sending texts, or accessing cellular data. This issue often arises after critical system modifications such as bootloader unlocking, flashing custom ROMs, or even certain firmware updates. Fortunately, for many MediaTek-powered devices, the solution lies in the meticulous restoration of the NVRAM and NVDATA partitions using the powerful SP Flash Tool. This comprehensive guide will walk you through the entire process, empowering you to regain full cellular functionality on your device.
At Magisk Modules, we understand the importance of a fully functional device. We are committed to providing users with the knowledge and tools necessary to overcome common Android challenges. This article is meticulously crafted to offer an in-depth understanding and a step-by-step procedure that aims to surpass existing guides in clarity, detail, and effectiveness, enabling you to fix null IMEI with confidence.
Understanding the Crucial NVRAM and NVDATA Partitions
Before delving into the practical steps of restoring these critical partitions, it’s essential to understand their significance. The NVRAM (Non-Volatile Random-Access Memory) and NVDATA are dedicated storage areas on your Android device that hold vital hardware-specific information. This information is crucial for the proper functioning of your device’s modem and network connectivity.
What is NVRAM?
The NVRAM partition stores essential configuration data for your device’s modem. This includes crucial identifiers such as your IMEI (International Mobile Equipment Identity), MEID (Mobile Equipment Identifier), Bluetooth MAC address, Wi-Fi MAC address, and various other radio frequency parameters. The IMEI is a unique 15-digit code that identifies your device to cellular networks, ensuring that only legitimate devices can connect. Without a valid IMEI, your device is effectively invisible to the cellular infrastructure, leading to the dreaded “Null IMEI” error.
What is NVDATA?
Closely related to NVRAM, the NVDATA partition often stores complementary data that the modem relies upon. While the exact contents can vary slightly between chipsets and manufacturers, it typically houses calibration data, frequency band information, and other configuration settings necessary for optimal radio performance. A corruption or accidental deletion of this partition can also lead to IMEI issues and other connectivity problems.
Why Do NVRAM and NVDATA Get Corrupted?
Several actions can inadvertently lead to the corruption or loss of data within the NVRAM and NVDATA partitions:
- Bootloader Unlocking: The process of unlocking the bootloader, while necessary for customization, can sometimes reset or alter critical partitions, including NVRAM.
- Flashing Custom ROMs: Incompatible or improperly flashed custom ROMs can overwrite or damage these essential partitions.
- Firmware Updates Gone Wrong: Aborted or interrupted official firmware updates can leave the system in an inconsistent state, affecting NVRAM.
- Rooting Procedures: Certain rooting methods, especially those that involve low-level partition manipulation, carry a risk of NVRAM corruption if not performed with utmost care.
- Hardware Malfunctions: Though less common, underlying hardware issues can sometimes manifest as NVRAM corruption.
- Accidental Partition Deletion: Using tools like SP Flash Tool or other partition management utilities without proper knowledge can lead to accidental deletion of these vital partitions.
The Importance of a Pre-emptive Backup
As highlighted in the initial description, the most crucial step before undertaking any significant system modification is to create a backup of your NVRAM and NVDATA. This backup acts as a safety net, allowing you to restore your device to its original functional state should any issues arise. While this guide focuses on restoration, we strongly advocate for proactive backups in all future endeavors. The process of backing up these partitions typically involves using specialized tools like TWRP recovery or other chipset-specific backup utilities.
Preparing for NVRAM and NVDATA Restoration Using SP Flash Tool
Before we begin the restoration process, meticulous preparation is paramount. This ensures a smooth and successful operation, minimizing the risk of further complications.
Essential Tools and Files You Will Need:
- SP Flash Tool: This is the primary utility for interacting with MediaTek chipsets. Download the latest stable version from a reputable source. Ensure you are using a version compatible with your specific device and chipset.
- MediaTek VCOM Drivers: These drivers are essential for your computer to recognize your MediaTek device in boot mode. Install them correctly on your Windows PC. Universal MediaTek VCOM drivers are often available, but it’s best to find drivers specific to your device if possible.
- Stock ROM (Firmware) for Your Device: This is absolutely critical. You need the original firmware file for your specific device model and build number. The NVRAM and NVDATA partitions are often specific to the firmware. You can usually find this on the manufacturer’s official website or reputable Android firmware repositories. Crucially, the stock ROM will contain the factory NVRAM and NVDATA files that you will use for restoration.
- Preloader File: This file, usually extracted from the stock ROM, is essential for SP Flash Tool to establish a connection with your device.
- Scatter File: This file, also found within the stock ROM, maps out all the partitions on your device’s storage. SP Flash Tool uses this to identify and access individual partitions like NVRAM and NVDATA.
- A Reliable USB Cable: A high-quality USB cable ensures a stable connection between your computer and the device. Avoid using damaged or faulty cables.
- A Fully Charged Device: Ensure your device has at least 60-80% battery charge to prevent interruptions during the flashing process.
Installing Necessary Drivers:
- Download and Extract SP Flash Tool: Unzip the SP Flash Tool archive to a dedicated folder on your computer.
- Install MediaTek VCOM Drivers:
- Open the driver installation package.
- Follow the on-screen instructions. In some cases, you might need to manually point to the driver files during device installation in Device Manager.
- Important: If you encounter issues with driver installation, try disabling driver signature enforcement in Windows. This is often necessary for installing unsigned drivers.
Locating the NVRAM and NVDATA Files for Restoration:
Within your downloaded stock ROM (which should be extracted into a folder), you will find a scatter file (typically a .txt file named after your device model or chipset). This scatter file contains information about the memory layout of your device. You will need to locate the sections corresponding to NVRAM and NVDATA.
Sometimes, the stock ROM will directly provide NVRAM backup files (e.g., nvram.bin, nvdata.bin) within its structure. If not, you might need to extract these specific partition images from the ROM itself, or, in some cases, from a separate NVRAM backup you might have previously made or obtained for your exact device model. For the purpose of this guide, we will assume you have the necessary .bin files for NVRAM and NVDATA readily available, ideally extracted from your device’s original stock firmware.
Step-by-Step Guide to Restoring NVRAM and NVDATA
This section details the precise steps required to utilize SP Flash Tool for restoring your Null IMEI by flashing the correct NVRAM and NVDATA partitions. Proceed with extreme caution, as flashing incorrect partitions can brick your device.
Step 1: Launching SP Flash Tool
- Navigate to the folder where you extracted SP Flash Tool.
- Locate and double-click the
flash_tool.exefile to launch the application. You may need to run it as an administrator (right-click and select “Run as administrator”).
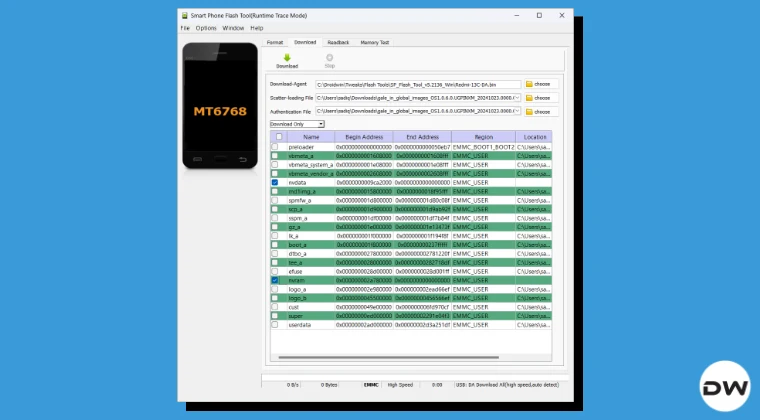
Step 2: Loading the Scatter File
- In the SP Flash Tool window, click the “Scatter-loading” button.
- A file browser window will appear. Navigate to the folder containing your stock ROM and select the scatter file (e.g.,
MTxxxx_Android_scatter.txt). - Once loaded, SP Flash Tool will display a list of all partitions on your device, along with their memory addresses and file names.
Step 3: Selecting NVRAM and NVDATA for Flashing
- In the list of partitions, locate the entries for “NVRAM” and “NVDATA”.
- Crucially, ensure that only the checkboxes next to “NVRAM” and “NVDATA” are ticked. Deselect all other partitions to avoid accidentally flashing or wiping them. This is vital to prevent unintended consequences.
- Double-click on the “Location” field for the NVRAM partition. This will open a file browser. Navigate to and select your
nvram.binfile. - Similarly, double-click on the “Location” field for the NVDATA partition. Navigate to and select your
nvdata.binfile. - Verify: Double-check that the correct
.binfiles are loaded against the correct NVRAM and NVDATA partitions.
Step 4: Choosing the Download Method
- At the top of the SP Flash Tool window, ensure that the download mode is selected. You will typically see options like “Download Only” and “Format All + Download.”
- For restoring NVRAM and NVDATA, “Download Only” is the recommended and safest option. This ensures that only the selected partitions are flashed. Avoid “Format All + Download” unless you are absolutely certain of what you are doing, as it will wipe your entire device.
Step 5: Initiating the Download/Restore Process
- Click the prominent “Download” button in SP Flash Tool.
- The tool will now wait for your device to be connected.
Step 6: Connecting Your Device in Download Mode
- Power off your Android device completely. Ensure it is fully shut down.
- Remove and reinsert the battery if your device has a removable one. This helps ensure a clean power cycle.
- Connect your device to your computer using the USB cable.
- Immediately press and hold the Volume Down button (or sometimes the Volume Up button, depending on your device model) while connecting the USB cable. This action triggers your device to enter Download Mode (also known as Preloader Mode).
- SP Flash Tool should detect your device. You will see a progress bar appear at the bottom of the tool, and a yellow or blue progress window will start filling up, indicating that the flashing process has begun.
Step 7: Monitoring the Flashing Process
- SP Flash Tool will now flash the NVRAM and NVDATA files to your device. This process usually takes a few minutes.
- Do not disconnect the USB cable or interrupt the process in any way. Doing so can lead to serious bricking.
- You will see a progress bar and status messages within the tool.
Step 8: Successful Flashing Confirmation
- Once the flashing process is complete, a green circular tick mark will appear in the SP Flash Tool window, along with a message like “Download OK” or “All files downloaded successfully.”
- This indicates that the NVRAM and NVDATA partitions have been successfully restored.
Step 9: Rebooting Your Device
- Safely disconnect your device from the computer.
- Power on your device normally by pressing the Power button.
- The first boot after flashing partitions can take longer than usual. Please be patient.
Post-Restoration Steps and Verification
After successfully flashing the NVRAM and NVDATA partitions, there are a few crucial steps to ensure everything is working as expected and to re-establish your device’s unique identifiers.
Verifying IMEI and Network Connectivity:
- Once your device has booted up, go to Settings > About Phone. Check if the IMEI information is now displayed correctly.
- Dial
*#06#on your phone’s dialer. This shortcut should display your IMEI. If it shows a valid IMEI (and not “Null” or all zeros), you are on the right track. - Insert your SIM card. Check if your device detects the network signal, allows you to make calls, send SMS messages, and access mobile data.
Re-entering Your IMEI (If Necessary):
In some cases, even after restoring the NVRAM and NVDATA partitions, the device might still not have a recognized IMEI. This often happens if the backup files were not perfectly representative of your device’s original state or if the corruption was severe.
If your IMEI is still missing or incorrect after restoration, you will need to re-enter your original IMEI. This is a critical step for your device to connect to cellular networks.
- How to Find Your Original IMEI: Your device’s original IMEI is usually printed on a sticker on the original retail box, or sometimes on a sticker located on the back of the device (often under the battery if removable) or in the SIM tray.
- Using IMEI Re-writing Tools: You will need a specialized tool that can write the IMEI to the NVRAM partition. These tools are often chipset-specific and can be found online. Examples include tools like SN Write Tool or Miracle Box (though these are more advanced and often used by service centers).
- Crucially, find a tool that is reputable and specifically designed for your device’s chipset (MediaTek).
- Follow the instructions of the IMEI re-writing tool precisely. This process is similar to using SP Flash Tool, where you will need to connect your device in a specific mode and provide your original IMEI.
- Ensure you are entering the correct IMEI. Incorrectly entered IMEIs can lead to further complications.
Note: Writing an IMEI that does not belong to your device is illegal in many regions. Always use the IMEI that was originally assigned to your specific device.
Restoring Other Unique Identifiers:
Besides the IMEI, the NVRAM and NVDATA also store other identifiers like the Bluetooth MAC Address and Wi-Fi MAC Address. If these have also been lost, they might need to be restored.
- Bluetooth MAC Address: This is often printed on the same sticker as the IMEI or found in the device’s original packaging. Some tools can rewrite this as well.
- Wi-Fi MAC Address: This is usually harder to find if lost. However, if your Wi-Fi is not working after NVRAM restoration, it could be related. Sometimes, a factory reset or re-flashing the entire stock ROM can regenerate these if they are not critically tied to a specific hardware ID that was lost.
Final Checks and Recalibration:
- Reboot your device one last time after verifying your IMEI and network connectivity.
- Test all cellular functions: Make calls, send texts, browse the internet using mobile data, and check for signal strength in different locations.
- Test Wi-Fi and Bluetooth: Ensure these functionalities are working correctly.
Troubleshooting Common Issues
Even with careful execution, you might encounter some snags. Here are solutions to common problems:
- SP Flash Tool Not Detecting Device:
- Ensure MediaTek VCOM drivers are installed correctly. Reinstall them if necessary.
- Try a different USB port on your computer.
- Use a different, high-quality USB cable.
- Make sure your device is powered off completely before connecting.
- Press and hold the correct button (Volume Down or Volume Up) during connection.
- Try running SP Flash Tool as administrator.
- Disable Driver Signature Enforcement in Windows.
- Flashing Fails with Errors (e.g., Error 4001, Error BROM):
- Ensure you are using the correct scatter file for your specific device and firmware version.
- Verify that the
nvram.binandnvdata.binfiles are not corrupted. Try re-downloading the stock ROM and extracting them again. - Check if the preloader file is being loaded correctly. Sometimes, a specific preloader from your stock ROM is required.
- Try a different version of SP Flash Tool.
- Device Stuck in Boot Loop or Bricked:
- This is the most severe outcome and indicates that critical partitions may have been corrupted or flashed incorrectly.
- Your best bet is to try flashing the entire stock ROM using SP Flash Tool. This will reformat and rewrite all partitions, hopefully recovering your device. Ensure you use the complete stock firmware package with its correct scatter file.
- If flashing the full stock ROM doesn’t work, your device might be hard-bricked and require specialized service.
Conclusion: Regaining Full Functionality
Fixing a Null IMEI by restoring NVRAM and NVDATA using SP Flash Tool is a technical but achievable process for MediaTek-powered devices. By meticulously following these steps, understanding the critical importance of correct firmware and partition files, and exercising caution, you can successfully revive your device’s cellular capabilities.
Remember, a proactive approach to backing up your NVRAM and NVDATA before any significant modifications is the most effective way to prevent such issues. For those who have already encountered the dreaded “Null IMEI,” this guide provides a robust solution.
At Magisk Modules, our mission is to empower users with knowledge and reliable resources like those found in our Magisk Module Repository. While this guide focuses on a hardware-level fix, exploring other modules and guides on our platform can enhance your overall Android experience safely and effectively. Embrace the power to restore and control your device, and enjoy seamless connectivity once again.