
Mastering Android Rooting: A Comprehensive Guide to Magisk and vendor_boot
In the dynamic world of Android customization, achieving root access unlocks a universe of possibilities, from advanced system modifications to unparalleled control over your device’s performance. Among the most sought-after methods for gaining this privileged status, Magisk stands out for its systemless approach, preserving the integrity of your core Android system. This guide delves deep into the intricacies of rooting your Android device using Magisk, with a specific focus on the crucial role of the vendor_boot partition, especially for devices running Android 13 and later. We aim to provide an exhaustive resource, enabling you to confidently navigate the rooting process and unlock the full potential of your smartphone.
Understanding the Core Concepts: Magisk, Boot Images, and vendor_boot
Before embarking on the rooting journey, it’s essential to grasp the fundamental components involved. Magisk is not merely a rooting tool; it’s a powerful framework that allows for modifications without altering the system partition. This “systemless” nature is its defining feature, ensuring that Over-The-Air (OTA) updates can be installed seamlessly and that apps requiring a pristine system environment, like banking applications, remain functional.
The traditional method of rooting often involved patching the boot.img file. The boot.img is a critical partition on an Android device, containing the kernel and ramdisk necessary to boot the operating system. By patching this image with Magisk, we inject the Magisk binaries and scripts, granting root privileges.
However, with the evolution of Android, particularly starting with Android 12 and 13, Google introduced significant changes to the boot process, leading to the adoption of new partition structures. For devices that shipped with Android 12 or older versions, the boot.img remained the primary target for Magisk patching. But for devices that first launched with Android 13 and beyond, the landscape shifted. These newer devices often employ a dual-boot partition scheme, where the vendor_boot partition plays a pivotal role.
The Evolution of Boot Partitions: From boot.img to init_boot and vendor_boot
The introduction of Project Treble and subsequent Android updates brought about architectural changes designed to improve modularity and security. On devices running Android 13 and later, the traditional single boot.img has been, in many cases, replaced or supplemented by other boot-related partitions.
- boot.img: This was the standard for older Android versions. It housed both the kernel and the ramdisk. Patching this image directly with Magisk was the common practice.
- init_boot.img: Introduced to further modularize the boot process, the init_boot.img primarily contains the ramdisk responsible for early init process execution. Devices that shipped with Android 13 and have this partition usually require patching init_boot.img.
- vendor_boot.img: This partition is crucial for devices that adopted the newer boot partition architecture. It contains components essential for the vendor-specific parts of the boot process, including the vendor ramdisk. When vendor_boot is present and utilized for early boot operations, Magisk patching is directed towards this file, not the standard boot.img or even init_boot.img on some devices.
Therefore, understanding which boot partition your specific device utilizes is paramount for a successful Magisk installation. Our focus here is on the scenario where vendor_boot is the correct partition to patch for rooting with Magisk, a common situation for many modern Android devices.
Preparing for the Rooting Process: Essential Prerequisites
Embarking on the journey to root your Android device requires careful preparation. Skipping any of these steps can lead to complications, data loss, or even an unusable device.
1. Back Up Your Data: A Non-Negotiable Step
Before making any significant system modifications, backing up all your important data is absolutely critical. This includes photos, videos, contacts, messages, application data, and any other files you deem valuable. While the Magisk rooting process is generally safe when performed correctly, unforeseen issues can arise. A comprehensive backup ensures that even in the worst-case scenario, your personal information is secure and can be restored. Consider using cloud storage services, dedicated backup applications, or transferring files to a computer.
2. Unlock Your Device’s Bootloader: The Gateway to Modification
To modify critical partitions like vendor_boot, you must first unlock your device’s bootloader. This is a security feature implemented by manufacturers that prevents unauthorized access to the device’s core software. The process for unlocking the bootloader varies significantly between manufacturers and device models. Generally, it involves enabling “OEM unlocking” in Developer Options, booting into the bootloader interface, and issuing a specific command via ADB (Android Debug Bridge). Be aware that unlocking the bootloader typically wipes all data on your device, which reinforces the importance of the backup step. Research the specific procedure for your device model thoroughly.
3. Install ADB and Fastboot Tools on Your Computer
ADB (Android Debug Bridge) and Fastboot are essential command-line tools that allow your computer to communicate with your Android device in various states, including the bootloader and recovery modes. You will use these tools to flash patched images and execute commands.
- Download the Android SDK Platform Tools: You can find these on the official Android developer website.
- Install them on your computer: Extract the downloaded archive to a convenient location and add the directory to your system’s PATH environment variable for easier access from any command prompt or terminal.
4. Identify Your Device’s Specific vendor_boot.img
This is arguably the most crucial step for rooting devices with a vendor_boot partition. You need to obtain the stock vendor_boot.img file that is specific to your device model and the exact firmware version you are currently running. Using an incorrect vendor_boot.img can lead to boot loops or bricking your device.
- Extract from Factory Images: The most reliable method is to download the official factory image or firmware package for your device from the manufacturer’s website or reputable firmware repositories. These packages often contain various partition images, including vendor_boot.img.
- Use Custom Recovery Tools: Some custom recoveries, like TWRP (Team Win Recovery Project), might offer options to extract partition images. However, ensure the recovery itself is compatible with your device’s Android version and partition layout.
- Community Forums and Repositories: Websites like XDA Developers are invaluable resources where users often share extracted stock partition images for specific devices. Always verify the source and ensure the image matches your device’s exact model and firmware build.
5. Download the Latest Magisk Manager APK
Visit the official Magisk GitHub repository or a trusted source for the latest stable version of the Magisk Manager APK. This application will be installed on your device after the rooting process to manage Magisk modules and settings.
The Step-by-Step Guide: Rooting with Magisk and vendor_boot
With all prerequisites met, we can now proceed with the actual rooting process. This guide assumes your device utilizes the vendor_boot partition for its early boot sequence, a common scenario for devices launched with Android 13 and later.
Step 1: Patching the vendor_boot.img with Magisk
This is the core of the rooting process. We will use the Magisk Manager app to patch your extracted stock vendor_boot.img.
- Transfer the Stock vendor_boot.img to Your Device: Copy the vendor_boot.img file you obtained in the preparation phase to your Android device’s internal storage or SD card. A folder like
Downloadis usually convenient. - Install Magisk Manager: If you haven’t already, install the Magisk Manager APK on your device. You might need to enable installation from unknown sources in your device’s security settings.
- Open Magisk Manager: Launch the Magisk application.
- Navigate to the Installation Section: Tap on the “Install” button (it might appear as an “Install” card or button).
- Choose “Select and Patch a File”: When prompted for the installation method, select the option to “Select and Patch a File.”
- Locate Your vendor_boot.img: Browse your device’s storage and select the vendor_boot.img file you transferred earlier.
- Start the Patching Process: Tap “Let’s Go” or a similar confirmation button. Magisk Manager will now patch the vendor_boot.img file.
- Locate the Patched Image: Once the patching is complete, Magisk Manager will inform you where the patched image has been saved. It is usually in the
Downloadfolder and will be named something likemagisk_patched-xxxxxxx.img. Note down this location.
Step 2: Transferring the Patched Image Back to Your Computer
Now, you need to move the newly created magisk_patched-xxxxxxx.img file from your device back to your computer. Connect your device to your computer via USB and copy the file to the same directory where you have your ADB and Fastboot tools installed.
Step 3: Booting Your Device into Fastboot Mode
This step requires using ADB and Fastboot.
- Enable USB Debugging: On your Android device, go to Settings > About Phone and tap on “Build number” seven times to enable Developer Options. Then, go to Settings > System > Developer Options and enable “USB debugging.”
- Connect Your Device to Your Computer: Use a USB cable to connect your phone to your PC.
- Open a Command Prompt or Terminal: Navigate to the directory where you have ADB and Fastboot installed.
- Verify Connection: Type the following command and press Enter:You should see your device’s serial number listed, along with a prompt to authorize USB debugging on your phone. Accept it.
adb devices - Reboot into Bootloader/Fastboot Mode: Now, type the following command:Your device should reboot into the bootloader interface. The screen will likely display fastboot information.
adb reboot bootloader
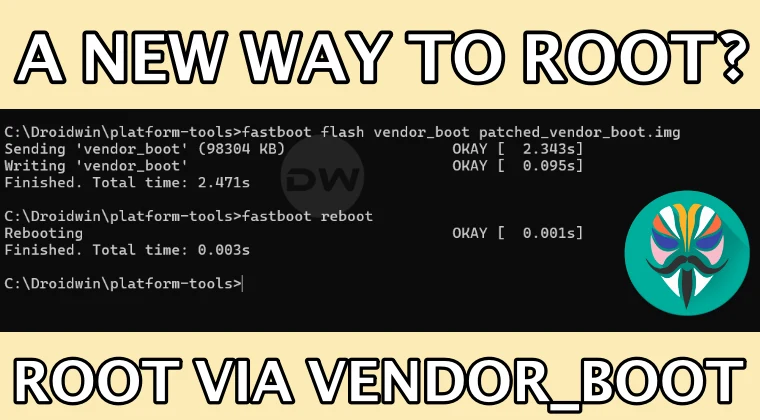
Step 4: Flashing the Patched vendor_boot.img
This is where we apply the patched image to your device’s vendor_boot partition.
- Verify Fastboot Connection: In the same command prompt/terminal window, type:You should see your device’s serial number listed, indicating it’s recognized in fastboot mode.
fastboot devices - Flash the Patched Image: Execute the following command, replacing
magisk_patched-xxxxxxx.imgwith the actual name of your patched file:This command tells your device to replace the contents of the vendor_boot partition with the Magisk-patched image. Wait for the flashing process to complete. You will see messages indicating success.fastboot flash vendor_boot magisk_patched-xxxxxxx.img - Important Note on partition structure: Some devices might have separate partitions for
vendor_bootandinit_boot. If your device usesinit_boot.imgfor the ramdisk andvendor_bootfor vendor specific components, you might need to patch and flash both, or only the relevant one as per device-specific instructions. However, for many devices shipping with Android 13+, thevendor_bootpartition is the primary target for Magisk patching when it contains the necessary ramdisk elements. Always confirm your device’s specific partition layout and recommended patching target.
Step 5: Rebooting Your Device and Verifying Root Access
Once the flashing is complete, it’s time to reboot and check if rooting was successful.
- Reboot Your Device: From the fastboot terminal, type:Alternatively, you can usually select “Start” or “Reboot” from your device’s bootloader menu.
fastboot reboot - Open Magisk Manager: Once your device has booted up, open the Magisk Manager application.
- Check for Successful Installation: Magisk Manager should now indicate that Magisk is installed and up to date. You should see green checkmarks and version numbers.
- Test Root Access: To further confirm, you can download a root checker app from the Google Play Store. These apps will guide you through a simple process to verify if root privileges are correctly granted.
Troubleshooting Common Issues and Advanced Considerations
Even with careful execution, you might encounter issues. Here are some common problems and their potential solutions, along with advanced tips for a seamless experience.
1. Bootloops After Flashing
A bootloop (device continuously restarting during boot) is a common and concerning issue.
- Cause: This often stems from an incorrect vendor_boot.img being used, a corrupted flash, or a conflict with existing system modifications.
- Solution:
- Reflash Stock vendor_boot.img: Boot back into fastboot mode and flash the original, unpatched stock vendor_boot.img. Then, try the patching process again, ensuring you have the correct file for your firmware.
- Wipe Cache/Dalvik Cache: If you can access your custom recovery (like TWRP), wiping the cache and Dalvik cache partitions can sometimes resolve boot issues.
- Full Factory Reset: As a last resort, you might need to perform a full factory reset via fastboot or recovery, which will erase all data but can restore the system to a functional state. You will then need to re-root.
2. SafetyNet and Play Integrity Failures
Many apps, especially banking and payment apps, rely on Google’s SafetyNet or the newer Play Integrity API to detect if a device has been modified. Rooting can cause these checks to fail.
- Solution:
- MagiskHide (Legacy) / DenyList (Current): Magisk includes features to hide its presence from specific apps. In Magisk Manager, navigate to Settings and enable “Zygisk” (if available) and configure the “Enforce DenyList.” Add the relevant apps (e.g., Google Play Services, Google Play Store, and the app failing the check) to the DenyList.
- Universal SafetyNet Fix Modules: Search for Magisk modules specifically designed to pass SafetyNet or Play Integrity checks. These are frequently updated to keep up with Google’s changes. Download and install them through the Magisk Manager modules section.
3. OTA Updates with Magisk
One of Magisk’s strengths is its ability to handle OTA updates gracefully.
- Procedure:
- Install OTA Update: Download and install the official OTA update through your device’s settings as usual.
- Re-patch Boot Partition: After the update, your root access will likely be lost because the OTA update overwrites the patched boot image. Open Magisk Manager, and it will prompt you to perform additional setup. Follow the on-screen instructions, which will involve repatching your newly updated boot partition (which might be
vendor_bootorboot.imgdepending on your device). - Reboot: Reboot your device. Root access should be restored.
4. Understanding Device-Specific Variations
It’s crucial to reiterate that every Android device is unique. While this guide provides a comprehensive overview for rooting via vendor_boot, your specific device might have nuances.
- Key Considerations:
- Partition Layout: Some devices might use a combination of init_boot.img and vendor_boot.img, requiring different patching strategies.
- Manufacturer Restrictions: Some manufacturers impose stricter bootloader unlocking procedures or have proprietary modifications that can complicate rooting.
- Firmware Complexity: Devices running heavily customized manufacturer ROMs might require specific Magisk modules or patches.
Always consult device-specific forums (like XDA Developers) for detailed instructions and potential pitfalls related to your exact device model and Android version. The community is an invaluable resource for sharing knowledge and troubleshooting unique problems.
The Power of Magisk Modules: Expanding Your Rooted Device’s Capabilities
Once your device is successfully rooted with Magisk, the real fun begins with Magisk Modules. These are add-ons that allow you to further customize your device without altering the system partition, leveraging Magisk’s systemless framework.
- What are Magisk Modules?: They are essentially zip files containing scripts and files that Magisk integrates into your system during boot. This could range from theming engines and performance tweaks to system enhancements and privacy tools.
- Finding Modules: The official Magisk Module Repository is an excellent starting point for discovering a vast array of modules. You can also find curated lists and discussions on developer forums.
- Installation: Installing modules is straightforward. Open Magisk Manager, go to the “Modules” tab, tap “Install from storage,” and select the downloaded module zip file. Reboot your device for the module to take effect.
- Essential Module Categories:
- Theming and UI Customization: Change system fonts, icons, and overall aesthetics.
- Performance Enhancements: Overclocking/underclocking kernels, I/O schedulers, and memory management tweaks.
- Audio Mods: Improve sound quality with Dolby Atmos, Viper4Android, or other audio processing tools.
- System Utilities: Ad blockers, debloaters, and advanced file managers.
- Privacy Tools: Enhanced privacy controls and app permission managers.
By judiciously selecting and installing Magisk modules, you can transform your rooted Android device into a personalized powerhouse, tailored precisely to your needs and preferences.
Conclusion: Embracing the Rooted Future with Confidence
Rooting your Android device using Magisk and understanding the role of partitions like vendor_boot is a significant step towards unlocking ultimate control over your mobile experience. This comprehensive guide has detailed the essential prerequisites, the step-by-step patching and flashing process for vendor_boot, crucial troubleshooting tips, and the expansive world of Magisk Modules.
By following these instructions diligently, prioritizing data backups, and always referring to device-specific resources when needed, you can confidently navigate the rooting process. The ability to customize, optimize, and enhance your Android device with Magisk opens up a realm of possibilities previously inaccessible. We encourage you to explore the vast ecosystem of Magisk modules and discover the full potential that a rooted device offers, ensuring a personalized and powerful Android journey. The future of your device’s customization is now firmly in your hands.