
Installing and Configuring the LSPosed Magisk Module for Android
For any Android power user, the ability to customize the operating system and add functionality is one of the main reasons people use Magisk. When it comes to Android customizations, one of the most well-known tools available is the LSPosed Magisk Module, which helps you manage and install Xposed modules with ease. This powerful tool will revolutionize the way Android works, and users can install different system tweaks, performance enhancements, and visual modifications without having to flash a custom ROM. Here, we show you how to install and configure the LSPosed Magisk module on your Android device.
What is LSPosed and Why Use It?
First, let me explain to you what LSPosed is and why you should have it running on your Android device before digging into the installation process.
LSPosed is the module designed for Magisk to support the installation and management of the so-called Xposed modules. These modules are called to let users customize their Android device or just to enhance its performance in some aspects. Whether you’re looking to tweak your UI, improve system performance, or modify existing apps, LSPosed offers a flexible solution for advanced users.
Unlike the traditional rooting, which for the most part relies on flashing custom ROMs, LSPosed works right out of the box with Magisk, hence much safer and more efficiently applies tweaks. Additionally, LSPosed supports Android 11 and newer versions, making it a go-to choice for users of modern Android devices.
Related Article
- Install LSPosed
- Configure HMA using the Blacklist Mode
- Configure HMA using the Whitelist Mode
- Hide My Applist Guide
- Hiding an app from Store
- Backup and Restore HMA settings
- HMA Blacklist vs Whitelist
- Magisk-SafetyNet-Fix
- Passing Integrity Check API Testing
- Shamiko
Requirements for Installing LSPosed
Before you start the installation process, ensure your Android device meets the following requirements:
- Magisk Installed: LSPosed is a sort of Magisk module, so you will first need to install Magisk on your device. You would have to root your device if it were not rooted by Magisk previously.
2. Custom Recovery: You will be using a custom recovery like TWRP to install Magisk and manage modules. Make sure your device is on a compatible version of Magisk and also a custom recovery has been installed on it. 3. LSPosed Zip File: You will have to download the LSPosed zip file on your device. You should search for the official zip file on trusted forums or GitHub repositories.
- Active Internet Connection: Some features of LSPosed may require an internet connection for module updates and installation.
Step 1: Downloading the LSPosed Magisk Module Zip File
First, you need to download the LSPosed zip file. Here’s how you can do it:
Download the Zip File: Click on the download link for the latest version of LSPosed, which should be in zip format. Save this zip file to a known directory on your device.
Step 2: Installing the LSPosed Magisk Module
After having the LSPosed zip file on your device, you can proceed to install it through the Magisk Manager:
Open the Magisk Manager: Open the Magisk Manager application on your device. If it is not installed, you may download it from any trusted sources.
Go to the Modules Section: You see the Modules section at the bottom of the screen. Tap to open the list of installed modules on your device.
Install from Storage: You will see an option at the top saying “Install from storage.” Tap this option to browse for the LSPosed zip file.
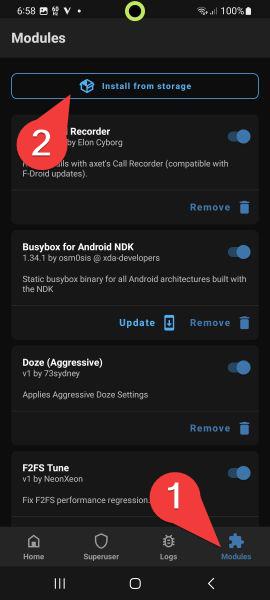 Image showing the option to install LSPosed from storage in the Magisk Manager.
Locate the LSPosed Zip File: Go to the folder into which you downloaded the LSPosed zip file and select it. Tap on the zip file to initiate installation.
Installation in Progress: The LSPosed module installation will begin. Once installation has completed, a notification will inform you that it has been successful.
**Step 3: Rebooting Your Device
Once the installation of the LSPosed module is complete, rebooting of the device will be required. Follow these steps:
- Reboot Your Device: At the end of a successful installation, tap to reboot your device; a prompt will come up asking for the same action. Tap Reboot to restart your phone.
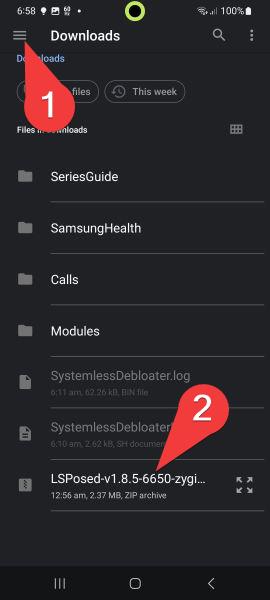 Image showing the prompt to reboot the device after installing LSPosed.
2. Reboot to Completion: Your device will automatically reboot into Android and load the newly installed LSPosed module and any updates therein.
Image showing the prompt to reboot the device after installing LSPosed.
2. Reboot to Completion: Your device will automatically reboot into Android and load the newly installed LSPosed module and any updates therein.
Step 4: Opening LSPosed Module Manager
You can now open the LSPosed Manager and start working with the installed modules after your device boots up.
Locate LSPosed in the Notification Pulldown: After your device has rebooted, pull down the top of the screen to enter your notifications. You should now see a notification titled “LSPosed Loaded”.
Expand the Notification: Expand the LSPosed Loaded notification to reveal more options.
Tap the Notification to Open the LSPosed Manager: Tap it to open **LSPosed Module Manager.
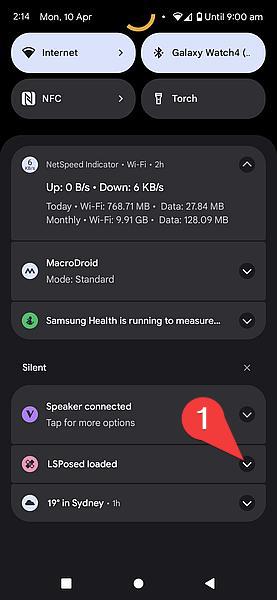
Image showing how to access the LSPosed Manager from the notification panel.
4. Explore the LSPosed Module Manager: Once inside the LSPosed Module Manager, you can browse and install various Xposed modules, configure existing settings, and adjust the behavior of your Android system.
Step 5: Configuring LSPosed and Installing Xposed Modules
Now that the LSPosed module is installed and enabled, you can further customize your Android device by installing other Xposed modules. These modules will let you perform system-wide changes, tweak apps’ behavior, and enhance performance. Here’s how you can install and configure Xposed modules:
Open LSPosed Module Manager: As shown earlier, you can access the LSPosed Manager from the notification pull-down. Open it to start managing your installed modules.
Browse Available Modules: In the LSPosed Manager, click the Modules tab to list available modules. Browse through the collection of modules to find those that best fit your needs.
Install a Module: Select any module you want to install. It may ask you to download the module if it’s not available on your device. Once downloaded, it will give instructions to install and enable the module.
Reboot to Apply Changes: In most cases, after installing any new module, you need to reboot your device to apply changes.
Troubleshooting LSPosed Installation Issues
Though LSPosed is a very stable and widely-used tool, some issues may still happen for users while installing or enabling. Here are the common troubleshooting steps one may take.
Magisk is Not Installed: Make sure to install Magisk-if not, or an outdated version is used, LSPosed will never work. Make sure you have installed the latest Magisk.
Modules Not Working After Installation: Clear the Magisk cache or reinstall the modules from the LSPosed Manager if they are not working after installation.
Device Compatibility: Make sure your device runs an Android version compatible with LSPosed. Though LSPosed can run on most devices, some custom ROMs or heavily modified firmware may not be compatible.
Reboot Problems: If, after installation of LSPosed your device doesn’t reboot, then just boot into recovery mode and clear the cache to resolve possible conflicts.
Conclusion
The LSPosed Magisk Module is one of the best options for getting custom Xposed modules on Android. Installation is easy, options for customization are powerful, and it supports new Android versions. Thus, LSPosed will be one of the best choices for Android enthusiasts. With this step-by-step guide, you will be able to install and set up LSPosed with ease, unleash new features, and boost your device’s performance without resorting to custom ROMs.
Frequently Asked Questions
What can be done using LSPosed?
LSPosed allows one to install and manage various Xposed modules in an Android device for customizations or performance-related features.
Is it compatible with Android 11 onwards?
Yes, LSPosed works fine with Android 11 and later, which would ideally suit recent Android devices.
**Can I install the LSPosed using a custom ROM?
No, LSPosed is integrated into the Magisk framework, so flashing of a custom ROM isn’t required. 4. Is LSPosed safe to use?
Yes, generally speaking, it is safe if downloaded from a source like the official GitHub page. 5. **Will I be able to uninstall LSPosed later?
Yes, you can uninstall LSPosed like any other Magisk module through Magisk Manager.